
The main purpose behind writing this tutorial was to provide a more detailed set of instructions for someone who is trying to implement an eigenface based face detection or recognition systems. It is assumed that the reader is familiar (at least to some extent) with the eigenface technique as described in the original M. Turk and A. Pentland papers (see "References" for more details).
1. Introduction
The idea behind eigenfaces is similar (to a certain extent) to the one behind the periodic signal representation as a sum of simple oscillating functions in a Fourier decomposition. The technique described in this tutorial, as well as in the original papers, also aims to represent a face as a linear composition of the base images (called the eigenfaces).
The recognition/detection process consists of initialization, during which the eigenface basis is established and face classification, during which a new image is projected onto the "face space" and the resulting image is categorized by the weight patterns as a known-face, an unknown-face or a non-face image.
2. Demonstration
To download the software shown in video for 32-bit x86 platform, click here. It was compiled using Microsoft Visual C++ 2008 and uses GSL for Windows.
3. Establishing the Eigenface Basis
First of all, we have to obtain a training set of  grayscale face images
  . They should be:
- face-wise aligned, with eyes in the same level and faces of the same scale,
- normalized so that every pixel has a value between 0 and 255 (i.e. one byte per pixel encoding), and
- of the same
 size.
size.
So just capturing everything formally, we want to obtain a set  , where \begin{align} I_k = \begin{bmatrix} p_{1,1}^k & p_{1,2}^k & ... & p_{1,N}^k \\ p_{2,1}^k & p_{2,2}^k & ... & p_{2,N}^k \\ \vdots \\ p_{N,1}^k & p_{N,2}^k & ... & p_{N,N}^k \end{bmatrix}_{N \times N} \end{align} and
Once we have that, we should change the representation of a face image  from a matrix, to a
  point in
  -dimensional space. Now here is how we do it: we concatenate all the rows of the matrix into one big vector of dimension . Can it get any more simpler than that?
This is how it looks formally:
 , where
  and
and 
Since we are much more interested in the characteristic features of those faces, let's subtract everything what is common between them, i.e. the average face.
The average face of the previous mean-adjusted images can be defined as  , then each face differs from the average by the vector
  .
.
Now we should attempt to find a set of orthonormal vectors which best describe the distribution of our data. The necessary steps in this at a first glance daunting task would seem to be:
- Obtain a covariance matrix
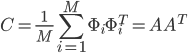 , where
 ![A = \left[ \Phi_1 \Phi_2 ... \Phi_M \right]](http://blog.manfredas.com/wp-content/plugins/latex/cache/tex_95e05c29c4d2ed0d862144b734d1200b.gif) .
. - Find the eigenvectors
 and eigenvalues
  of
of  .
.
However, note two things here:  is of the size
  and hence the matrix is of the size
  . To put things into perspective - if your image size is
  , then the size of the matrix would be
  . Determining eigenvectors and eigenvalues for a matrix this size would be an absolutely intractable task!
So how do we go about it? A simple mathematical trick: first let's calculate the inner product matrix  , of the size
  . Then let's find it's eigenvectors
  of
of  (of the -th dimension). Now observe, that if
  , then
and hence  and
and  are respectively the eigenvectors (of -th dimension) and eigenvalues of . Make sure to normalize
  , such that
  .
.
We will call these eigenvectors the eigenfaces. Scale them to 255 and render on the screen, to see why.
It turns out that quite a few eigenfaces with the smallest eigenvalues can be discarded, so leave only the  ones with the largest eigenvalues (i.e. only the ones making the greatest contribution to the variance of the original image set) and chuck them into the matrix
 ![U = \left[ u_1 u_2 ... u_R \right]_{N^2 \times R}](http://blog.manfredas.com/wp-content/plugins/latex/cache/tex_57491af98e75f833a0a80e05eaf5825f.gif)
After you have done that - congratulations! We won't need anything else, but the matrix  for the next steps - face detection and classification.
4. Face Classification Using Eigenfaces
Once the eigenfaces are created, a new face image  can be transformed into it's eigenface components by a simple operation:
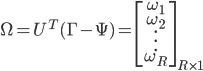 .
.The weights  describe the contribution of each eigenface in representing the input face image. We can use this vector for face recognition by finding the smallest Euclidean distance
  between the input face and training faces weight vectors, i.e. by calculating
  . If
. If  , where
  is a treshold chosen heuristically, then we can say that the input image is recognized as the image with which it gives the lowest score.
The weights vector can also be used for an unknown face detection, exploiting the fact that the images of faces do not change radically when projected into the face space, while the projection of non-face images appear quite different. To do so, we can calculate the distance
is a treshold chosen heuristically, then we can say that the input image is recognized as the image with which it gives the lowest score.
The weights vector can also be used for an unknown face detection, exploiting the fact that the images of faces do not change radically when projected into the face space, while the projection of non-face images appear quite different. To do so, we can calculate the distance  from the mean-adjusted input image
  and its projection onto face space
 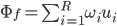 , i.e.
  . Again, if
  for some treshold
  (also obtained heuristically, for example, by observing for an input set consisting only of face images and a set of non-face images) we can conclude that the input image is a face.
5. References
1. Face Recognition Using Eigenfaces, Matthew A. Turk and Alex P. Pentland, MIT Vision and Modeling Lab, CVPR ‘91.
2. Eigenfaces for Recognition, Matthew A. Turk and Alex P. Pentland, Journal of Cognitive Neuroscience ‘91.
3. Eigenfaces. Sheng Zhang and Matthew Turk (2008), Scholarpedia, 3(9):4244.
Hi,
just thought i'd say that you've done a great tutorial (from what i understand of it lol). i was just wondering if i could take a look at your source code or if you have a sample project for me to better understaind eigenfaces as my algebra isn't too great :p
Thanks,
Alex
Čia tai geras ^^ Čia laisvalaikiu ar su mokslu susiję ?
Great, thank so much. Your tutorial helps me a lot. very much appreciate!!
Thanks, Alex!
Apologies, but the source code is not available at the moment... On the other hand - it's literally following the maths described in this tutorial, so if you're worried about implementing these algebraic operations - you might want to look at GSL (GNU Scientific Library, you can find a pretty good documentation for it online). Also, to get a better grip on the method behind eigenfaces itself, I suggest you to read a bit about PCA (Principal Component Analysis), there are quite a few tutorials online on the subject.
Laisvalaikiu, tėvai... Deja... :-}
Thanks, Midorj, glad to hear that!
Dear ,
Good Artical.
Actually why do we need a grayscale face images ?
what is the diffent between grayscale and " normalized (so that every pixel has a value between 0 and 255 (i.e. one byte per pixel encoding) )"
It is great Tutorial.
but i have 1 question.
After calculate eigenvectors,eigenvectors is already become [0.255]?
or do scale [0.255]?
Hi Viduruvan, technically there is no reason why you shouldn't try coloured encoding and see if you obtain a better recognition rate. It might be the case that digital noise from the webcam will introduce a lot of variance in 8-bit color mode, but... give it a shot!
Hi Yuya,
No, the eigenvectors in general will not be in the range [0..255]. You should scale them to that range if you want to render them on the screen, however, for the face classification step make sure that your eigenvectors are normalized.
Hi,
Brilliant tutorial, one question however...
The values I get for my eigenVectors are floats (some are negative values), when you say normalized..what do you mean? Do I take the absolute value of the numbers?
Thanks for your help
Tom
Hi Tom,
You should make sure that the length of the each eigenvector (the square root of the sum of its squared components) is equal to one.
See this link if you need more details:
http://en.wikipedia.org/wiki/Unit_vector
Hope this helps!
In the covariance matrix calculation you said that
C=(1/M)*sum(phi*phitranspose) = A* Atranspose , I think this is wrong, doesn't it have to be C=(1/M )*A*Atranspose
Thanks Bro this is greatest tutorial. Every thing is explained very beautifully and completely.
Thanks Allot.
Thank you very much for this post, it was hands down the best around. I've successfully implemented this method. One question though, shouldn't the U matrix be size N*N x R and not NxR? Or did I miss something?
Thanks Jason, it is indeed supposed to be N*N x R. I've fixed it in the tutorial above, very well spotted!
Hi,
Thank you very much for the helpful explanation on eigenfaces. I am implementing this in C++ and wondering how you generate the user interface? Did you use OpenCV or its equivalent? Also, if I successfully captured the training images, how can I align them so that their eyes are in same level and face of the same scale? Thanks for your help.
Nice tutorial, it was clear and complete. However, may I ask how you were able to get input from your webcam? I can't seem to find any sources how. Thanks!
I think there is an error in the dimensions of the "picture-vector" (which you obtained by concatenating the rows of the image matrix into a vector). The correct dimensions should be N^2 x 1.